

Learning Ghidra Basics Analyzing Firmware
Introduction
It has been a while since I have analyzed any program or firmware. The majority of my previous experiences were mostly analyzing Capture The Flag (CTF) binaries with the help and instruction from my good friend Matt Carpenter of Grimm Security. While extremely helpful, I always knew I was looking for a vulnerability that should be easy to find since I mainly stuck with the easy to medium difficulty challenges. Analyzing actual firmware for a vulnerability is much different. While most programs “should” have vulnerabilities, there is no guarantee of a flag at the end, like in CTF binaries, that can be verified by submitting a string of bytes for points.
Reversing programs or firmware was never a priority in my daily duties. When I was reviewing binaries I often found myself looking at firmware based on the ARM or MSP430 architecture. Since the free version of Hex-Rays IDA does not work with ARM or MSP430 binaries, I found myself gravitating to the tool Vivisect. Vivisect was useful to me because it is written in Python and Matt uses it on a regular basis. But, I have always wondered if using a tool like IDA Pro would make reverse engineering easier for me. Thus, when Ghidra was released, I knew I needed to find a project to help me learn how to use it.
Next, I needed to find a good target firmware with known vulnerabilities. I often thought that looking at the firmware for the Moxa 5610 Serial-to-Ethernet converter would be interesting, but I put it off. Then I ran into Jason Larsen of IOActive during an assessment. Over dinner we talked about the attack on the Ukrainian power grid and the fact that the attackers bricked the Moxa devices. That’s when he told me about his BSides Idaho Falls talk titled “14 Hours and an Electric Grid” where he broke down his analysis process using the Moxa 5610 as an example.
With Jason and Matt in on my side, how could I not take a look at the Moxa firmware. I decided that I needed to record my effort to help me remember my steps. After banging my head on a few issues, I realized this might be helpful to others who are starting out reversing firmware and using Ghidra. The following is an outline of some of the issues I had to overcome while analyzing the Moxa firmware with Ghidra. I definitely had help during this journey and I’ll include references to Jason and Matt throughout. This project would have taken much longer, and would have been much more frustrating, without their input.
Spoiler, I don’t identify any vulnerabilities during this write-up. It is just an outline of the steps I used to begin the analysis and learning process.
Obtaining Firmware for Analysis
First I needed to get the actual firmware to analyze. Moxa provides firmware online to download and update their devices. Several months ago the site provided older versions of the firmware. Thus, firmware versions with vulnerabilities could be obtained for analysis. I downloaded older versions of firmware for the 5600 devices. Since then, Moxa has updated their site so that only the latest version of the firmware can be downloaded. Good for them.
Initially, I tried to analyze the downloaded files by importing it directly into Ghidra. This did not work very well and I came to realize that Moxa bundles firmware updates in a proprietary binary file format (ROM). To analyze the device’s functionality the firmware must be extracted from the ROM. The ROM contains a file header with bytes that detail the size of the firmware and pointers to the offset of the starting byte of the firmware. With a little deductive reasoning these values can be located. Fortunately for me, Jason had already performed this analysis and shared his insight. He also informed me that the Moxa devices use ARM-based firmware that is compiled in little endian byte order, a condition I had not accounted for during my initial analysis.
Firmware Disassembly with Ghidra
Ghidra needs to understand a few things about the firmware to analyze it correctly. As Matt has pointed out to me many times (paraphrased), “Nearly every four byte chunk can be disassembled into an ARM instruction, but it doesn’t mean it’s actually an instruction. It is important to understand how it was compiled, and where it starts, to analyze it correctly.”
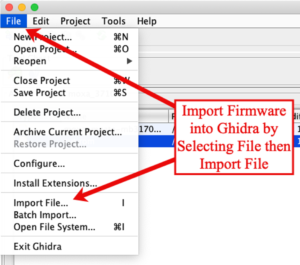
To begin, I imported the extracted firmware file from the ‘File’ menu.
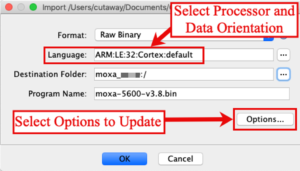
Once selected, Ghidra needs to understand how the firmware was compiled. For this example, I set the “Format:” option to “Raw Binary.” Next I set the processor and orientation (endianness) of the data by selecting the “ARM:LE:32:Cortex:default” option which represents ARM Cortex Little Endian, as shown in the following image. Additionally, depending on where the firmware was obtained, the base address of the code needs to be specified. If so, click on the options button and update those settings. For this example, modifying the settings in the “Options…” window are not necessary and I just clicked the “OK” button.
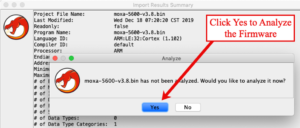
Once imported, Ghidra asked to analyze the file for opcodes and other values. I clicked the “Yes” button to initiate the analysis.
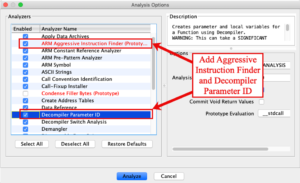
Ghidra has many options to help analyze a file. The default settings are typically enough to get started. There are a few unselected items that I found are useful when troubleshooting these analysis steps. The “ARM Aggressive Instruction Finder” appears to take an extra pass or apply some more advanced analysis of the bytes in the file. This extra effort helps to identify ARM instructions (opcodes) that may not have been recognized on the initial analysis of the file. This extra analysis has the benefit of reducing some manual instruction analysis (which will be covered in a moment) but can also result in the incorrect assignment of opcodes to a series of bytes. I feel the benefits outweigh the risks for this option. The second useful option is the “Decompiler Parameter ID”. While analyzing the file, Ghidra will attempt to decompile functions into higher level language, C. This option adds additional information to the decompiled function that can help with manual analysis of the code. Both of these options will add time to the initial analysis while, I feel, helping to reduce follow-on manual analysis steps. I added both of these options and clicked the “Analyze” button to begin the analysis.
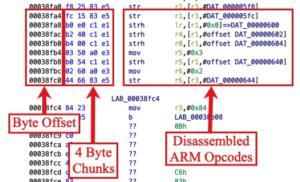
Once completed Ghidra will display the disassembled representation of the firmware. The image below shows the display areas that represent the byte offset, the actual bytes, and the disassembled instructions.
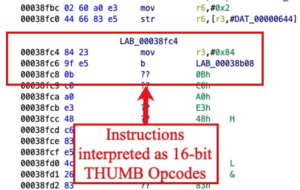
Most of the firmware should be disassembled as Arm instructions. To confirm, manual review must be performed. The image below shows a series of bytes where Ghidra interpreted the bytes as Thumb instructions. Some firmware may contain Thumb instructions. In this case, there should be no Thumb instructions and this is a mistake.
To correct this mistake the instruction must be cleared. I right clicked on the instruction (although I could have clicked on the bytes or the offset, as well). Ghidra popped up a menu that allowed me to “Clear Code Bytes.” I selected this option to reset the bytes.
![]()
Once cleared, I right clicked again, this time on the first byte. Ghidra popped up a menu and I selected “Disassemble – Arm.” Selecting this option forces Ghidra to analyze the bytes as Arm instructions.
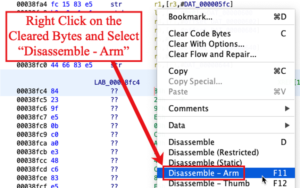
The result was a series of bytes updated as Arm instructions. Fortunately, Ghidra did not just stop at the four-byte chunk I clicked on. It continued to analyze the following bytes resulting in a new series of Arm instructions. I repeated all of these steps from the beginning to the end of the binary.

Towards the end of the firmware the Arm instructions stop and the firmware’s data section begins. This data area contains structures and strings that are referenced throughout the firmware. Most of the strings had been automatically identified by Ghidra during the analysis of the firmware. However, like the Arm instructions, Ghidra had issues identifying all of the strings. Manual analysis was necessary to interpret all of the strings missed during Ghidra’s analysis. Identifying strings in the firmware is necessary because Ghidra will automatically update any references from the Arm instructions to these strings. Reversing the functionality of each function is easier when these strings are identified and referenced correctly.
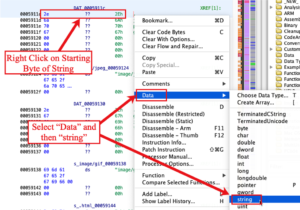
The steps for updating string references is similar to updating Arm instructions. I right clicked on the first byte of the string and selected the “Data” reference in the pop-up menu. A submenu was displayed and I selected the “string” option. I continued this from the beginning of the data section to the end of the firmware for all strings I could manually identify.
Manually updating the Arm instructions and string references may seem tedious. But, for accurate analysis, these steps are necessary because it updates many of the references and jumps within the analyzed code. Running through each of the Moxa firmwares I analyzed took me about an hour to complete these steps. Matt assured me these are necessary actions that must be performed when starting to analyze a new program or firmware (I may have bitched at him about it, a little). He also points out that this process makes the analyst more familiar with the firmware. Interesting things definitely jumped out at me, like references to passwords, while I was taking these manual steps.
Reviewing the Analyzed Firmware
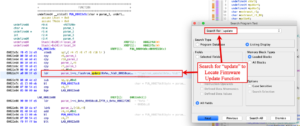
Once Ghidra has disassembled all of the ARM instructions it was time to figure out what the firmware is doing. Finding a starting point can sometimes be difficult. There are many strategies for reverse-engineering firmware. Jason had mentioned to me that there are plenty of debugging strings to help identify where the firmware accepts input. I decided to try and find the function where the firmware managed updates. Starting with the “Search” option, from the Ghidra menu, I selected “Program Text…” and searched for the term “update” across “All Fields.” This detected the string “s_flashrom_update” at offset 0x022d74.
From here I attempted to understand what this function is doing by reviewing both the Arm instructions and the decompiled code. The decompiled code is displayed in the “Decompile” windows which typically opens on the right side of the Ghida tool. The decompiled code is an interpretation of the Arm instructions in this function. The Ghidra analyzer outlines incoming parameters, local variables, actions taken within the function, and what the function returns. All of this information can be reclassified or renamed by the analyst to get a better understanding of the code. When parameters, variables, or pointers are renamed all of the references to that object are updated throughout the program.
For instance, I reviewed the decompiled code for the function containing the “update” string. The string is passed into another function with the original name of “FUN_00022e5c”. (Ghidra named this function according to the offset of the function within the code base.) My analysis determined that this function is a print or logging statement. Therefore, I updated the function name from “FUN_00022e5c” to “print_log_message-???”. I included the “???” at Matt’s recommendation because I was initially unsure if my assumption about the function’s purpose was correct. This also helps others, reviewing the code with me, understand when I am certain about a function’s purpose or if I’m taking a Wild Ass Guess (WAG) at it.

Conclusion
As I mentioned, this is a description of how I started familiarizing myself with Ghidra and analyzing firmware. Nothing special here, just the learning process. Hopefully you found something you can use or that you can see I’m doing fundamentally wrong. If you have questions or input just ping me on Twitter using @cutaway. You can direct message me, we can exchange emails, or we can jump on a Slack channel. Just reach out.
Depending on the interest in this topic, I’ll generate a follow on post where I identify some familiar functions such as strcpy. I have also generated a few Ghidra scripts to help analyze firmware from different devices and identify interesting and similar functionality. Those can be found on the Cutaway Security Github in the Ghidra section of CutSec_Tools.
Additional Note: After I completed this post the Ghidra Ninja posted an excellent video about this topic. Be sure to check out Bare-metal ARM firmware reverse engineering with Ghidra and SVD-Loader. It has helped me understand some of the things I could have done better with this. The SVD-Loader option is excellent and I’m hoping it will help with some of the pointers that are necessary to understand functionality and ensure the code references and disassembly is correct. But sure to subscribe to the channel for great tutorials about Ghidra and reversing.
Go forth and do good things,
Don C. Weber
Cutaway Security, LLC.
Email: don@cutawaysecurity.com
Website: https://www.cutawaysecurity.com
Twitter: https://twitter.com/cutaway
SANS Instructor: https://www.sans.org/instructors/don-c-weber